Loading Poker.Forum…

Finished Barrington/ESPN table with topper

65 replies

RjchangoNewbie4 posts
Posted Jul 31, 2022, 5:21 PM#1

So here is the finished version, with the Rounders topper thanks to rjdrv7!!! 1st game in a couple weeks. But everyone that has seen it loves it. Just waiting on the battery I ordered of Amazon (https://www.amazon.com/?tag=amznpcfx-20) for the led’s so I don’t have to plug it in. New lights, new padding, new SSC, deeper cup holders.

SnapplefactsNewbie3 posts
Posted Feb 26, 2023, 3:40 AM#2

Nice-looking table! Apologies for bumping an old thread, but did the topper hide the LEDs? I’m considering combining a stock ESPN table with a custom topper.

LovejoyzMicro-Stakes Grinder10 posts
Posted Feb 27, 2023, 10:26 PM#3

Great-looking table! Sorry to bring this up in a year-old thread, but did the topper hide the LEDs? I’ve been considering pairing a stock ESPN table with a custom topper.

I actually wondered the same when I saw an ESPN table for sale a few weekends back. I didn’t want to buy it only to have the mat cover the LEDs. If that happened, I’d choose the other table without LEDs rather than have them showing every few feet around the table because they weren’t flush with the mat.

BigSlickTuxMicro-Stakes Grinder9 posts
Posted Feb 27, 2023, 11:38 PM#4

Great-looking table! Sorry to bump a year-old thread, but did the topper end up covering the LEDs? I’ve been considering matching a stock ESPN table with a custom topper.

It works quite well. Only a handful of lights are obscured, but I suspect that’s due to uneven rail vinyl. Here are some photos of it.

LovejoyzMicro-Stakes Grinder10 posts
Posted Feb 28, 2023, 2:44 AM#5

Damn…for a 4 table portable setup, getting a few of these and putting mats on them for $279 sounds like a decent plan… they’re pretty easy to travel with, right?

BigSlickTuxMicro-Stakes Grinder9 posts
Posted Feb 28, 2023, 2:47 AM#6

They’re somewhat heavy but manageable. You could possibly fasten a strap-style handle.

MrBooshRegular32 posts
Posted Feb 28, 2023, 3:36 AM#7

I picked up one of these storage bags for my Barrington table and it makes it much easier to transport!!! I'm not worried about scuffing up the rails now and you can just put a shoulder through the handle and carry it pretty easy. They were a little cheaper on Prime day when I picked it up though. But still worth it if you are transporting a table now and then.

Global Storage Folding Poker Table Bag for 48"-Octagon Poker Table and 84"-Oval Poker Table,Two Sizes https://a.co/d/aKw5VfK (https://a.co/d/aKw5VfK?tag=amznpcfx-20)

SharpeidoNewbie2 posts
Posted Mar 4, 2023, 2:06 AM#8

For those looking at the ESPN table I just picked one up from walmart.com for under $300. It came in a box with no damage and I was very surprised in the quality for a $300 table. It is sturdy and a good size for 6 to 8 players. I purchased to use as a travel table as some of our buddies do not have a table and this makes for a great travel table or a secondary table. I did order a topper for it just because I will like the feel of a topper compared to the felt and the felt looks like it could stain easy.

As for the lights, I will never use them when playing cards. I might turn on before the game or as a decoration, but they are annoyingly bright and distracting.

MrBoosh, thanks for the link for the bag. I just ordered one to use to protect and tote. The table is 70 lbs and can be handled by 1 person, but the odds of scratching the sides in transport is likely so the tote will be a good addition.

SnapplefactsNewbie3 posts
Posted Mar 4, 2023, 2:24 AM#9

For those looking at the ESPN table I just picked one up from walmart.com for under $300. It came in a box with no damage and I was very surprised in the quality for a $300 table. It is sturdy and a good size for 6 to 8 players. I purchased to use as a travel table as some of our buddies do not have a table and this makes for a great travel table or a secondary table. I did order a topper for it just because I will like the feel of a topper compared to the felt and the felt looks like it could stain easy.

As for the lights, I will never use them when playing cards. I might turn on before the game or as a decoration, but they are annoyingly bright and distracting.

MrBoosh, thanks for the link for the bag. I just ordered one to use to protect and tote. The table is 70 lbs and can be handled by 1 person, but the odds of scratching the sides in transport is likely so the tote will be a good addition.

I didn’t know Walmart had them for sub-300 right now. Might have to pick one up. Do you think it could fit 10? Or would probably be an uncomfortable squeeze?

SharpeidoNewbie2 posts
Posted Mar 4, 2023, 2:34 AM#10

10 would be snug but doable. 8 would be preferable. We use 6-8 in our usual way so it will suit us. Regarding $300 it was worthwhile. I purchased $263 though I believe it was via a third party on walmart.com. still, $299 represents a solid bargain.

MrBooshRegular32 posts
Posted Mar 4, 2023, 2:39 AM#11

I didn’t know Walmart had them for sub-300 right now. Might have to pick one up. Do you think it could fit 10? Or would probably be an uncomfortable squeeze?

You can fit 10 but it might be a little shoulder to shoulder but still doable. 9 is better. They are great tables especially fir the money. Plus you can get awesome toppers for them for not much more. The Walmart price for the espn Barringtons is a good deal!!!!

RomeMicro-Stakes Grinder6 posts
Posted Mar 5, 2023, 12:23 AM#12

So here’s the completed version, featuring the Rounders topper thanks to rjdrv7!!! 1st game in a couple weeks. Everyone who’s seen it really likes it. I’m just waiting on the Amazon battery I ordered for the LEDs so I won’t need to keep it plugged in. New lights, new padding, new SSC, and deeper cup holders.

Would you be willing to share which battery you purchased for the LED hookup and how it’s performed for you?

RomeMicro-Stakes Grinder6 posts
Posted Mar 5, 2023, 3:42 PM#13

Would you be willing to share which battery you purchased for the LED plug-in and how it's performed for you?

Answering my own question for anyone else searching. I discovered these in a Reddit thread from another ESPN table owner — they report they function flawlessly:

https://www.amazon.com/gp/product/B09131Y9L8/ref=ppx_yo_dt_b_asin_title_o01_s00?ie=UTF8&psc=1 (https://www.amazon.com/gp/product/B09131Y9L8/ref=ppx_yo_dt_b_asin_title_o01_s00?ie=UTF8&psc=1&tag=amznpcfx-20)

Insert 8 AA, attach the pack to the underside of the table, and you're set.

RansoraNewbie3 posts
Posted Mar 10, 2023, 12:39 AM#14

For those looking at the ESPN table I just picked one up from walmart.com for under $300. It came in a box with no damage and I was very surprised in the quality for a $300 table. It is sturdy and a good size for 6 to 8 players. I purchased to use as a travel table as some of our buddies do not have a table and this makes for a great travel table or a secondary table. I did order a topper for it just because I will like the feel of a topper compared to the felt and the felt looks like it could stain easy.

As for the lights, I will never use them when playing cards. I might turn on before the game or as a decoration, but they are annoyingly bright and distracting.

MrBoosh, thanks for the link for the bag. I just ordered one to use to protect and tote. The table is 70 lbs and can be handled by 1 person, but the odds of scratching the sides in transport is likely so the tote will be a good addition.

I just got mine from walmart in today, and it seemed to have scratches on it in the vinyl... Is this actually a seam or something or should I complain and get a new one? Did yours come with this? There's a big gash on each side, flop side of the table across from each other. None on the turn/river side.

dmoneyRegular32 posts
Posted Mar 10, 2023, 1:15 AM#15

I bought one of these storage bags for my Barrington table and it makes transporting it a lot simpler!!! I'm no longer concerned about scratching the rails, and you can slip a shoulder through the handle to carry it quite easily. They were slightly cheaper on Prime Day when I bought mine, but still worth getting if you move a table occasionally.

Global Storage Folding Poker Table Bag for 48"-Octagon Poker Table and 84"-Oval Poker Table, Two Sizes https://a.co/d/aKw5VfK (https://a.co/d/aKw5VfK?tag=amznpcfx-20)

Omg I've been searching for a solution. Thank you!

MrBooshRegular32 posts
Posted Mar 10, 2023, 1:46 AM#16

OMG — I’d been searching for a fix. Thank you!

No worries. I was pleased to discover this too. Happy to share a safer, improved method for moving the table!

NymorMicro-Stakes Grinder18 posts
Posted Mar 10, 2023, 1:51 AM#17

I just got mine from walmart in today, and it seemed to have scratches on it in the vinyl... Is this actually a seam or something or should I complain and get a new one? Did yours come with this? There's a big gash on each side, flop side of the table across from each other. None on the turn/river side.

That doesn't look right at all.

RansoraNewbie3 posts
Posted Mar 10, 2023, 1:53 AM#18

That doesn't look right at all.

sad...... fedex girl called me and asked if i was home to try and help her carry it to my porch, I wasn't. She said she didn't have a dolly and needed help so was gonna leave it in my driveway, but it was at my porch when i got home... probably happened then

dmoneyRegular32 posts
Posted Mar 10, 2023, 3:14 AM#19

No problem. I was pleased to find this too. Happy to share a safer, improved method for transporting the table!

Just placed my order! I really like my Barrington and hope this fixes its main issue: it’s heavy and awkwardly shaped, which makes it somewhat of a pain to move.

I installed a betting line before Christmas and am planning to upgrade the cup holders this spring/summer.

Hot NutsShark105 posts
Posted Mar 10, 2023, 3:45 AM#20

I just got mine from walmart in today, and it seemed to have scratches on it in the vinyl... Is this actually a seam or something or should I complain and get a new one? Did yours come with this? There's a big gash on each side, flop side of the table across from each other. None on the turn/river side.

RansoraNewbie3 posts
Posted Mar 10, 2023, 3:46 AM#21

fml that shit was heavy LOL

Hot NutsShark105 posts
Posted Mar 10, 2023, 3:47 AM#22

My Barrington box from Amazon (https://www.amazon.com/?tag=amznpcfx-20) arrived beat to hell, but it was double-boxed and the contents were fine.

RomeMicro-Stakes Grinder6 posts
Posted Mar 11, 2023, 3:18 AM#23

No problem. I was also pleased to discover this. Glad to be able to share a safer, better way to transport the table!

I just got my ESPN table and the bag you recommended here. It's impossible to get the table into the bag. If I pushed any harder the zipper edges would have scuffed/teared the vinyl. Either my opening is too small or you folks have some kind of magic technique for fitting this table into that bag. I spent half an hour trying to force it before blurting an obscenity, giving up, and initiating a return with Amazon (https://www.amazon.com/?tag=amznpcfx-20). You all who have it... how?

MrBooshRegular32 posts
Posted Mar 11, 2023, 4:35 AM#24

Just received my ESPN table and the bag you recommended here. It is impossible to get this table into the bag. If I pushed it any harder the zipper sides would have scratched/ripped the vinyl. Either my opening is undersized or you all have some sort of magic process for getting this table to fit in this bag. I spend half an hour trying to fit it before dropping an obscenity, giving up, and putting in a return with amazon. You guys who have it... how?

Most of the time I lift the table up and have my daughters on each side of the bag slowly fit the sides into the bag. Then we scoot each side a bit at a time, back and forth until the bag is pulled up.all the way. Then I can zip it up. It is a bit tight at first but once it gets going it gets easier. My buddy @TravNasty (https://www.pokerchipforum.com/members/13721/) has layed it on its side and worked the bag over the bottom while it was laying on the floor I believe. I am not sure if there is a width difference in the ESPN vs standard Barrington table. I measured mine and without smashing the foam down it is right about 5.5 inches.

RomeMicro-Stakes Grinder6 posts
Posted Mar 11, 2023, 4:55 AM#25

Most of the time I lift the table up and have my daughters on each side of the bag slowly fit the sides into the bag. Then we scoot each side a bit at a time, back and forth until the bag is pulled up.all the way. Then I can zip it up. It is a bit tight at first but once it gets going it gets easier. My buddy @TravNasty (https://www.pokerchipforum.com/members/13721/) has layed it on its side and worked the bag over the bottom while it was laying on the floor I believe. I am not sure if there is a width difference in the ESPN vs standard Barrington table. I measured mine and without smashing the foam down it is right about 5.5 inches.

View attachment 1096997 (https://www.pokerchipforum.com/attachments/1096997/)

Mystery solved, my ESPN table is over 6" thick, assumedly the thickness accomodates the LED strip! Thanks for this info, you saved my sanity, but now I need to find a new solution :)

MrBooshRegular32 posts
Posted Mar 11, 2023, 5:04 AM#26

Mystery solved, my ESPN table is over 6" thick, assumedly the thickness accomodates the LED strip! Thanks for this info, you saved my sanity, but now I need to find a new solution :)

I wondered if it was thicker even though the pictures on the sales pages say it is 5 inches. I was thinking, how is that less than a standard Barrington with the LED's? I am glad you saved your sanity but sad your table doesn't fit.

sjpj21wMicro-Stakes Grinder19 posts
Posted Jun 30, 2026, 7:10 AM#27

Hey, I just got this table and was wondering how you made the cupholders deeper. The stock ones are so shallow. Did it require a lot of handiwork/customizing or is it simply a matter of ordering a particular set and swapping them out?

So here’s the finished version, with the Rounders topper thanks to rjdrv7!!! 1st game in a couple weeks. Everyone who’s seen it loves it. I’m just waiting on the battery I ordered from Amazon for the LEDs so I won’t have to leave it plugged in. New lights, new padding, new SSC, deeper cup holders.

View attachment 958804 (https://www.pokerchipforum.com/attachments/958804/)View attachment 958806 (https://www.pokerchipforum.com/attachments/958806/)

RjchangoNewbie4 posts
Posted Jun 30, 2026, 5:09 PM#28

Hey, I just picked up this table and was wondering how you got the cupholders deeper? The stock ones are really shallow. Was it a lot of DIY/custom work or can you just order different ones and swap them out?

You can order deeper cupholders and simply swap them in. Pretty straightforward. I believe I bought them from a link someone shared in another thread.

SnapplefactsNewbie3 posts
Posted Jun 30, 2026, 5:54 PM#30

You can order the deeper ones, then replace them. Pretty straightforward. I believe I purchased them from a link someone shared in a different thread.

From what I recall, it isn’t overly difficult but will likely need a heat gun and a drill fitted with a hole-cutting bit

chipzillaRegular35 posts
Posted Jun 30, 2026, 7:37 PM#32

Thanks for all the help everyone! Does anyone have a link to step-by-step directions for adding COB LED lights with a dimmer and a battery pack? I found this thanks to y’all’s help:

https://www.pokerchipforum.com/threads/barrington-poker-table-thread.30910/post-2352520

But I’m wondering if there’s a more thorough guide somewhere?

That greedintern post is THE walkthrough for installing COB LED lights. It’s pretty simple: buy the specified parts and hook them up. If you run into a particular issue, ask. It uses 12V LEDs, a 12V battery pack, and a 12v dimmer.

I followed that guide, but I used a 5V LED strip, a 5V battery pack and dimmer because I wanted to use a regular cell-phone style battery bank I already had instead of a dedicated 12v pack. You can see my post with the specifics here:

https://www.pokerchipforum.com/threads/barrington-poker-table-thread.30910/post-2800995

sjpj21wMicro-Stakes Grinder19 posts
Posted Jun 30, 2026, 8:03 PM#33

That greedintern's post is THE guide for adding COB LED lights. It's pretty straightforward, just buy the parts noted and connect them. If you have a specific question, just ask. It uses 12V LEDs, a 12V battery pack, and a 12v dimmer.

I followed it, but used a 5V LED strip, 5V battery pack and dimmer, because I wanted to use a standard cell-phone type battery bank/pack I already have, instead of a special dedicated 12v pack. You can see my post with details here:

https://www.pokerchipforum.com/threads/barrington-poker-table-thread.30910/post-2800995

One specific question that I have is do you use anything to affix the LED strip into the space in front of the other LEDS or is it just a stuff and snuggly fit kind of situation?

I also don't fully understand how to take the wired LED strips from the top of the table to the bottom of the table. Am I supposed to drill two holes for each side of the wire connecting the top to the bottom and wire them through to the bottom or is there a hole that the default LEDs have that I could put the new LEDs through?

This is my amazon (https://www.amazon.com/?tag=amznpcfx-20) cart right now (yes, I don't own a drill that's the level amateur DIY that I'm currently at):

chipzillaRegular35 posts
Posted Jun 30, 2026, 8:13 PM#34

One specific question that I have is do you use anything to affix the LED strip into the space in front of the other LEDS or is it just a stuff and snuggly fit kind of situation?

The COB LED strips backside is a adhesive strip. Just peel the film off the back to expose the adhesive and attach the new strip on top of the old existing strip.

FYI, I compared a couple 8mm wide COB strips to the 5mm wide COB strips. And it looked to me like the actual discrete LED emitters themselves were the same size. The only difference was the width of the adhesive backing. If this is important to you, you can probably visually confirm this in the supplier's pics before you buy or after you receive them. I used the 5mm strips because that's what was available on amazon (https://www.amazon.com/?tag=amznpcfx-20) at the time and it adhered to the old strips just fine.

I think greedyintern noted the 8mm strip size was able to also just press into the gap under the rail and hold there. It was just the right size to fit and hold with some friction. So that could be a advantage.

ef28Micro-Stakes Grinder10 posts
Posted Jun 30, 2026, 8:21 PM#35

One particular question I have is: do you use anything to secure the LED strip into the gap in front of the other LEDs, or is it simply a snug press-fit situation?

I also don't fully grasp how to route the wired LED strips from the tabletop down to the underside. Am I expected to drill two holes for each side of the wire that connects the top to the bottom and thread them through to the bottom, or is there an existing hole in the stock LEDs that I can use to pass the new LEDs through?

This is what’s in my Amazon cart right now (yes, I don’t own a drill — that’s the level of DIY amateur I currently am at):

View attachment 1697359 (https://www.pokerchipforum.com/attachments/1697359/)

FYI, you might not be able to make the holes with that drill. Speaking from experience, I tried using my Ryobi and it didn’t do the job. I bought a good Milwaukee drill and it finished the hole in a few minutes (you have to stop and start a few times to avoid cutting through the vinyl).

sjpj21wMicro-Stakes Grinder19 posts
Posted Jun 30, 2026, 8:39 PM#36

The COB LED strips backside is a adhesive strip. Just peel the film off the back to expose the adhesive and attach the new strip on top of the old existing strip.

FYI, I compared a couple 8mm wide COB strips to the 5mm wide COB strips. And it looked to me like the actual discrete LED emitters themselves were the same size. The only difference was the width of the adhesive backing. If this is important to you, you can probably visually confirm this in the supplier's pics before you buy or after you receive them. I used the 5mm strips because that's what was available on amazon at the time and it adhered to the old strips just fine.

I think greedyintern noted the 8mm strip size was able to also just press into the gap under the rail and hold there. It was just the right size to fit and hold with some friction. So that could be a advantage.

This is very helpful. Thank you. I can't even tell what mm the LEDs in my cart are (https://www.amazon.com/gp/product/B0BVR755VK/ref=ox_sc_saved_title_1?smid=A3OE3R3Z65YA6J&th=1 (https://www.amazon.com/gp/product/B0BVR755VK/ref=ox_sc_saved_title_1?smid=A3OE3R3Z65YA6J&th=1&tag=amznpcfx-20)), but they're the same ones that greedintern linked. Do you know if you have to make a new hole to put the new LEDs through to get to the bottom of the table or if I could use a preexisting hole from the stock LEDs?

sjpj21wMicro-Stakes Grinder19 posts
Posted Jun 30, 2026, 8:40 PM#37

FYI, you might not be able to drill the holes with that drill. Take it from me, I tried using my Ryobi and it did nothing. Bought a good Milawakee drill and it completed the hole in a few mins (you have to stop and start a few times to make sure you don't cut through the vinyl).

Thanks so much for the drill rec. I was worried about the drill power too. Do you know what model of Milawakee would be good enough? Also what do you mean "make sure you don't cut through the vinyl"? Aren't I supposed to drill from the bottom up? and the first thing you would go through is the vinyl?

chipzillaRegular35 posts
Posted Jun 30, 2026, 8:50 PM#38

One specific question that I have is do you use anything to affix the LED strip into the space in front of the other LEDS or is it just a stuff and snuggly fit kind of situation?

I also don't fully understand how to take the wired LED strips from the top of the table to the bottom of the table. Am I supposed to drill two holes for each side of the wire connecting the top to the bottom and wire them through to the bottom or is there a hole that the default LEDs have that I could put the new LEDs through?

This is my amazon cart right now (yes, I don't own a drill that's the level amateur DIY that I'm currently at):

View attachment 1697359 (https://www.pokerchipforum.com/attachments/1697359/)

The parts in your cart related to LEDs are 12V. I didn't use those. But if they are the same as what @greedyintern (https://www.pokerchipforum.com/members/17235/) used, then they will work. See my earlier post I noted for the 5V parts I used.

For the hole saw in your cart, that looks like the same one greedyintern used, so it should work. I used a different brand, Lenox based on some other posts that suggested it was the best. A good saw is important. Needs to be sharp and durable to cut all those cupholder holes.

https://www.amazon.com/dp/B0054SBE4E?ref_=ppx_hzod_title_dt_b_fed_asin_title_0_2&th=1 (https://www.amazon.com/dp/B0054SBE4E?ref_=ppx_hzod_title_dt_b_fed_asin_title_0_2&th=1&tag=amznpcfx-20)

For the 20v drill in your cart, I don't know that brand. But 20V drills generally are powerful so should work and worth a try at that good price. A powerful drill is helpful/important. I used a Dewalt corded drill, a well known brand, but most others used a battery drill. When you start drilling those cupholder holes, the hole saw is going to grab the wood and tend to want to suddenly stop and twist and jerk the drill in your hand. A smooth high speed drilling technique is the target to get through the table. Be ready when you approach the end of the hole.....it will tend to punch through when you reach the end and hit the foam in the rail. Put something underneath like scrap wood or tile, etc, to protect whatever is under the table (wood floor, carpet, etc).

For how to feed the LED strip through the table, here is the pic from greedyintern that shows the existing hole. Just feed the new strip through there. The other side of the hole is in the edge of the rail, visible when you slightly fold your table closed. Just follow the path of the existing LED lights.

chipzillaRegular35 posts
Posted Jun 30, 2026, 8:58 PM#39

This is very helpful. Thank you. I can't even tell what mm the LEDs in my cart are (https://www.amazon.com/gp/product/B0BVR755VK/ref=ox_sc_saved_title_1?smid=A3OE3R3Z65YA6J&th=1 (https://www.amazon.com/gp/product/B0BVR755VK/ref=ox_sc_saved_title_1?smid=A3OE3R3Z65YA6J&th=1&tag=amznpcfx-20)), but they're the same ones that greedintern linked. Do you know if you have to make a new hole to put the new LEDs through to get to the bottom of the table or if I could use a preexisting hole from the stock LEDs?

That looks like same LED's that greedyintern used, so they are 8mm wide. It looks 8mm to me too by looking at the pics in Amazon (https://www.amazon.com/?tag=amznpcfx-20) (you can see a slightly wider strip). The description for this strip didn't mention its 8mm width. Some of the other strips on amazon (https://www.amazon.com/?tag=amznpcfx-20) do include that detail.

If you have a LED table, then the hole already exists to pass the strip through the table. See my prior post.

sjpj21wMicro-Stakes Grinder19 posts
Posted Jun 30, 2026, 9:10 PM#40

Awesome. Replaced the saw in my cart with the Lenox one you recommended and going to look for a better drill too. Do you know what @ef28 (https://www.pokerchipforum.com/members/19839/) meant by make sure you don't cut through the vinyl? Also do you know the difference between using the 12V vs 5V that you used and 8mm vs the 5mm strips? Or I guess are there any advantages of going with either? I know you said the 8mm is wider but the light distances are the same as the 5mm, but does a wider or less wide strip have any benefit here?

ef28Micro-Stakes Grinder10 posts
Posted Jun 30, 2026, 9:56 PM#41

I was referring to the rail padding. When you cut the opening, you’re cutting toward the rail. If you’re not careful you can cut the hole and tear through the rail’s padding.

chipzillaRegular35 posts
Posted Jun 30, 2026, 9:57 PM#42

Awesome. I swapped the saw in my cart for the Lenox one you suggested and I’m going to hunt for a better drill too. Do you know what @ef28 (https://www.pokerchipforum.com/members/19839/) meant by making sure you don’t cut through the vinyl? Also, do you know the difference between using the 12V vs 5V that you used, and 8mm vs the 5mm strips? Or are there any benefits to choosing one over the other? I know you said the 8mm is wider but the light distances are the same as the 5mm, but does a wider or narrower strip offer any advantage here?

Regarding cutting through the vinyl, here’s what the top of the rail looks like after removing the old cup holder but BEFORE cutting the new hole. The new opening will be larger. You can see that the vinyl fabric overlaps the larger opening. When sawing, you don’t want to go too deep and cut or damage that vinyl.

12v/5v is independent from 8mm/5mm. You can mix and match whatever combination you prefer.

I personally think 5v is useful: it lets you avoid buying a dedicated 12v battery and instead use an existing phone power bank if you have one. Also, some power banks have standard USB-A connectors which simplify the hookup. In terms of LED performance/intensity, there’s no difference. In other words, there’s no reason to favor 12v in my view, except that there MIGHT be more variety among 12v strips.

For 8mm width, the benefit is it fits more snugly under specifically the Barrington LED rail (I’m not sure about other tables). For the 5mm strip, there’s no real advantage. One minor plus is I could squeeze my topper under the installed 5mm strip because its smaller width provided a bit of clearance. Probably not important to most people.

Regarding LED density — i.e., 480 LEDs/meter vs 400 vs 320 — they’re all plenty bright. Too bright, hence the dimmer. All of them are a big improvement over the original LEDs. Once powered, you can’t really distinguish individual LED emitters in practice; they appear diffused compared with the originals. Choose your LED strip based on voltage 12/5v and width 8/5mm, and don’t worry about density as so long as it’s 320/meter or higher, IMO.

sjpj21wMicro-Stakes Grinder19 posts
Posted Jun 30, 2026, 10:11 PM#43

Awesome, got it — thank you so much. I think I'll go with the 5mm width because I'm having a custom topper made by rjdev7, so it should fit better with the 5mm and 5v, I suppose. The only thing: in your photo the LEDs look more cool white than warm white — which color option did you choose for these: https://www.amazon.com/dp/B0DZH99SWJ?ref=ppx_yo2ov_dt_b_fed_asin_title&th=1 (https://www.amazon.com/dp/B0DZH99SWJ?ref=ppx_yo2ov_dt_b_fed_asin_title&th=1&tag=amznpcfx-20)

Also, if I don't mind simply plugging into the wall, could I just buy the lights and the connector kit and hook the COB LEDs up to the power supply used by the stock LEDs?

chipzillaRegular35 posts
Posted Jun 30, 2026, 10:41 PM#44

Awesome, got it — thank you so much. I think I'll go with the 5mm width because I'm getting a custom topper made by rjdev7, so hopefully it will fit better with the 5mm and 5v, I guess. The only thing is, in your photo the lights look more cool white than warm white — which color option did you choose for these: https://www.amazon.com/dp/B0DZH99SWJ?ref=ppx_yo2ov_dt_b_fed_asin_title&th=1 (https://www.amazon.com/dp/B0DZH99SWJ?ref=ppx_yo2ov_dt_b_fed_asin_title&th=1&tag=amznpcfx-20)

Also, if I don’t mind just plugging it into the wall, could I simply buy the lights and the connector kit and hook the COB LEDs to the power supply that the stock LEDs use?

The LED color of my lights is warm-white-3000k. They probably just appear cool white in my photos because of poor lighting.

The stock power supply that shipped with my Barrington table is labeled 12v output. So it’s NOT compatible with 5V LEDs. You’d need to use the 12V LED if you want to use that power supply. You’ll still need a dimmer unless you enjoy extremely bright, blinding lights. The lights, dimmer, and power supply/battery all must share the same voltage to be compatible, so purchase them accordingly.

sjpj21wMicro-Stakes Grinder19 posts
Posted Jun 30, 2026, 11:07 PM#45

The LED color of my lights are warm-white-3000k. They probably just look like cool white in my pics because of a bad pic.

The stock power supply that came with my Barrington table says it has 12v output. So its NOT compatible with 5V LEDs. You'd have to use the 12V LED if you want to use that power supply. You will still need to use a dimmer, unless you like super bright blinding lights. The lights, dimmer and power supply/battery all have to use the same voltage to be compatible, so buy them accordingly.

Awesome thank you so much. I think I might go with warm-white-2700k because I think I want it a little glowyer/less white (please tell me if this is a mistake).

For the LEDs I'm thinking these: https://a.co/d/0b2RvW8C (https://a.co/d/0b2RvW8C?tag=amznpcfx-20) -- 12V to match the stock power supply (in case I go with that), 5mm width to work better with the custom topper, and 400 LEDS/M meeting your 320 recommendation.

For the dimmer: https://a.co/d/00jhTYh0 (https://a.co/d/00jhTYh0?tag=amznpcfx-20) -- 12V-24V so it'll match the LEDs (will the dimmer still work if I decide to stick to the stock power supply?)

For the wire connections: https://a.co/d/0hNNueEO (https://a.co/d/0hNNueEO?tag=amznpcfx-20) (I'm assuming this has everything I would need)

And then if I want to do the battery in the future I will get a 12V battery.

Thank you so much for all of your insight. This has been so helpful. I can't wait to update with the results.

chipzillaRegular35 posts
Posted Jul 1, 2026, 6:06 AM#46

Awesome thank you so much. I think I might go with warm-white-2700k because I think I want it a little glowyer/less white (please tell me if this is a mistake).

For the LEDs I'm thinking these: https://a.co/d/0b2RvW8C (https://a.co/d/0b2RvW8C?tag=amznpcfx-20) -- 12V to match the stock power supply (in case I go with that), 5mm width to work better with the custom topper, and 400 LEDS/M meeting your 320 recommendation.

Yes, That LED strip will work if you want 12v and 5mm.

For the dimmer: https://a.co/d/00jhTYh0 (https://a.co/d/00jhTYh0?tag=amznpcfx-20) -- 12V-24V so it'll match the LEDs (will the dimmer still work if I decide to stick to the stock power supply?)

Yes, That dimmer will work for your selected 12v LED strip. Yes, you can use it with the stock power supply too (though I can only assume the connectors are compatible in size since I don't have that info).

For the wire connections: https://a.co/d/0hNNueEO (https://a.co/d/0hNNueEO?tag=amznpcfx-20) (I'm assuming this has everything I would need)

Problem here. The connectors you selected are for 8mm wide strip lights. You need 5mm wide if you plan to use the strip light you noted above. I looked quickly on amazon (https://www.amazon.com/?tag=amznpcfx-20) and don't see an equivalent connector kit for 5mm (you can check further). You need these same contents but for 5mm strips. Specifically, the connectors that attach to the strip won't fit. You need 1) minimum two strip connectors that fit 5mm strips on one end and have a female DC barrel connector on other end , and 2) One DC power splitter that splits from one female barrel connector to two male barrel connectors. You could explore more to see if you can find these items.

Alternatively, you could change to the 8mm LED strip light, and then keep the connector kit you selected which would then be compatible.

I'm assuming these DC power barrel connectors all fit compatibly. I didn't use them so I can't confirm. Worst case, you can try and easily return to Amazon (https://www.amazon.com/?tag=amznpcfx-20) if they don't fit.

And then if I want to do the battery in the future I will get a 12V battery.

Yes, you can use a 12V battery instead of the 12V power supply if desired.

sjpj21wMicro-Stakes Grinder19 posts
Posted Jul 1, 2026, 2:14 PM#47

Yes, That LED strip will work if you want 12v and 5mm.

Yes, That dimmer will work for your selected 12v LED strip. Yes, you can use it with the stock power supply too (though I can only assume the connectors are compatible in size since I don't have that info).

Problem here. The connectors you selected are for 8mm wide strip lights. You need 5mm wide if you plan to use the strip light you noted above. I looked quickly on amazon and don't see an equivalent connector kit for 5mm (you can check further). You need these same contents but for 5mm strips. Specifically, the connectors that attach to the strip won't fit. You need 1) minimum two strip connectors that fit 5mm strips on one end and have a female DC barrel connector on other end , and 2) One DC power splitter that splits from one female barrel connector to two male barrel connectors. You could explore more to see if you can find these items.

Alternatively, you could change to the 8mm LED strip light, and then keep the connector kit you selected which would then be compatible.

I'm assuming these DC power barrel connectors all fit compatibly. I didn't use them so I can't confirm. Worst case, you can try and easily return to Amazon if they don't fit.

Yes, you can use a 12V battery instead of the 12V power supply if desired.

Looks like there's mainly 8mm and 10mm kits, but I found these two:

5mm strip connecter with female barrel (https://a.co/d/01MPoL1D?tag=amznpcfx-20) or this (https://a.co/d/01bgsddH?tag=amznpcfx-20). Not many reviews on the 5mm strip connectors worries me a bit. Could go with the 8mm, but I just checked the space and it's so tight even without a topper so 5mm seems like it'd work better.

Along with one of these 12V DC splitter 2 male/1 female (https://a.co/d/014WDOp8?tag=amznpcfx-20) could work? Is there a specific DC splitter measurement I need to get? I'm seeing 5.5 x 2.1, 5.5 x 2.5, and 3.5 x 1.35.

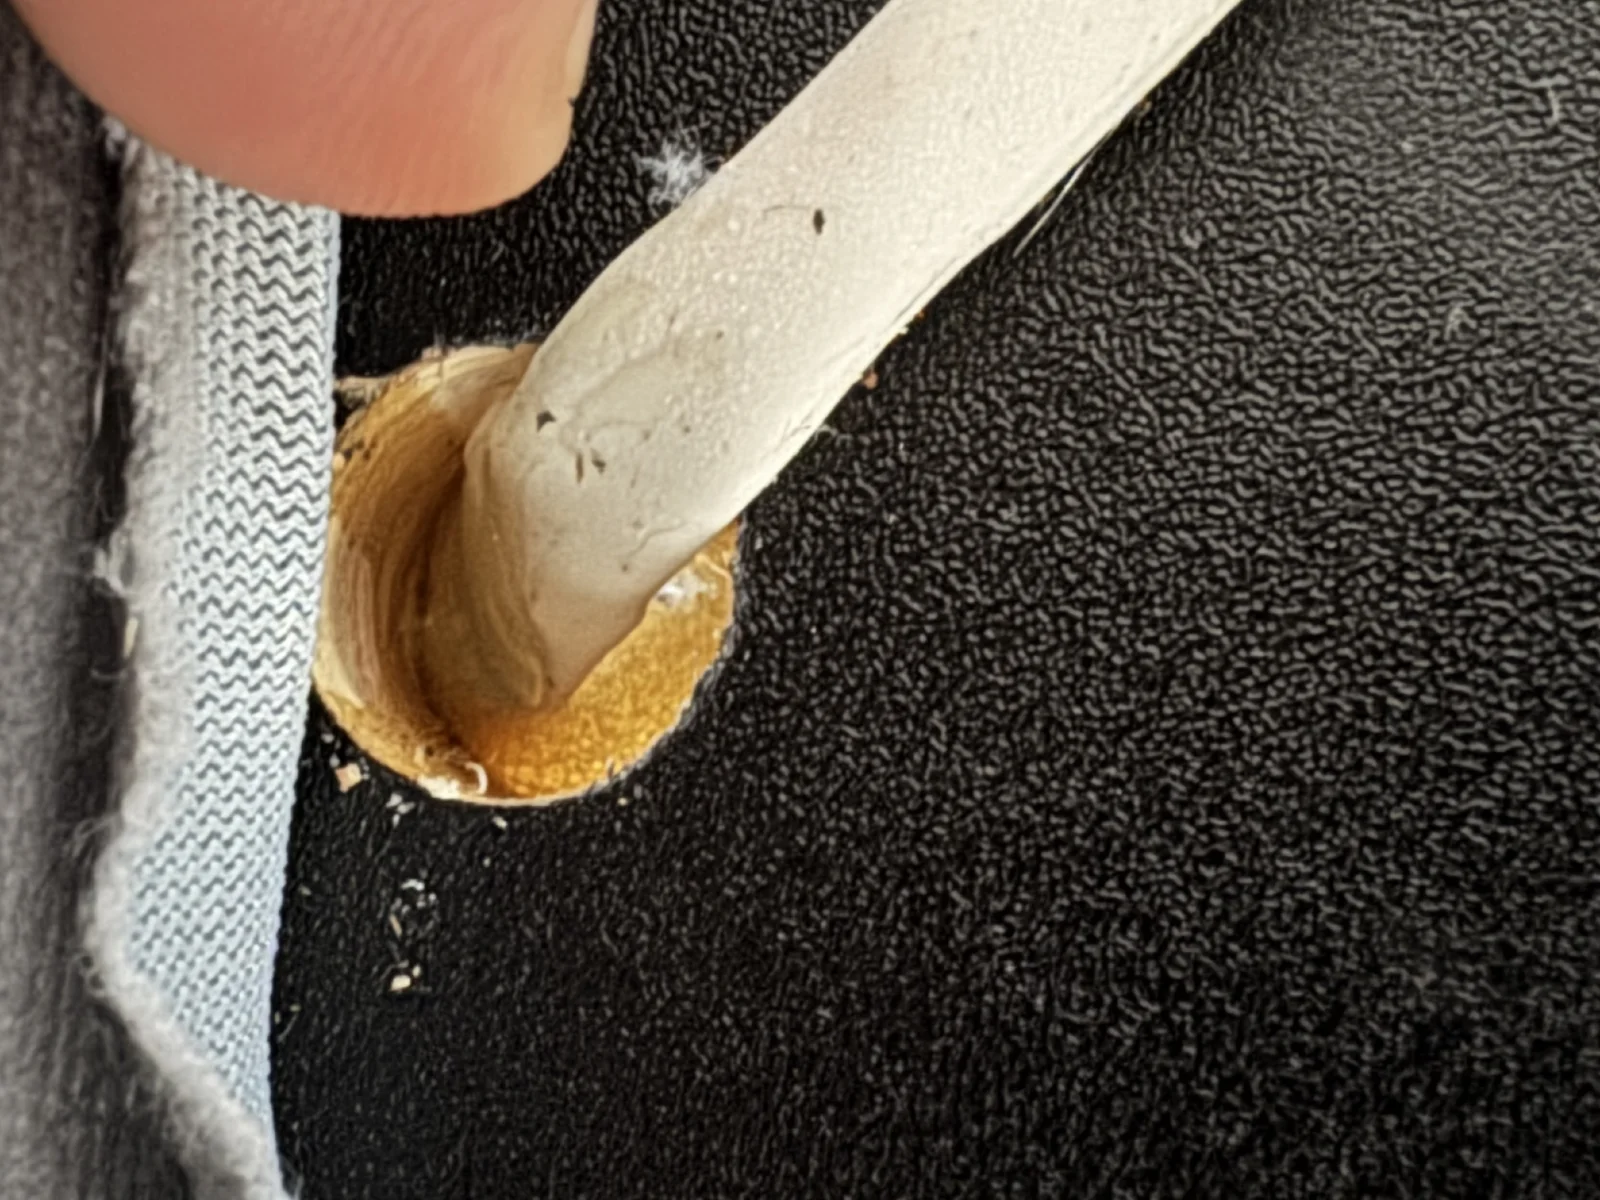
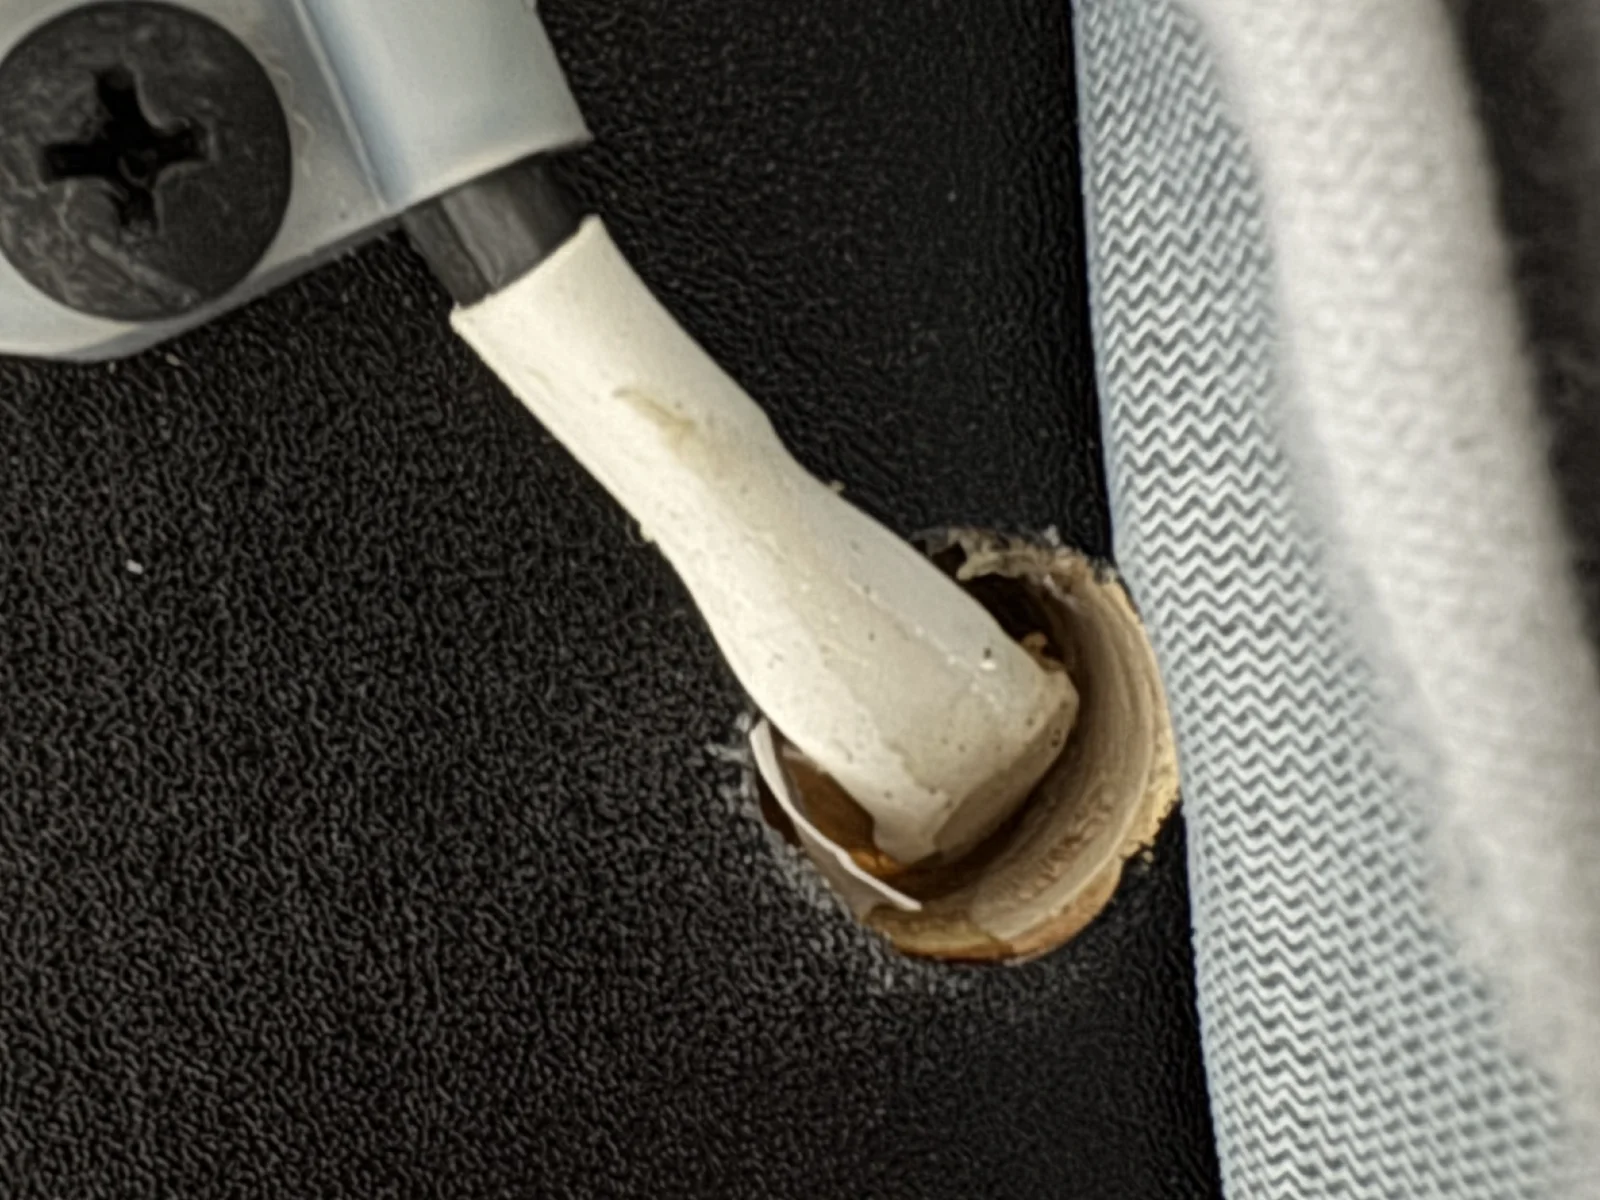
Also I found the holes that the stock LED wires go through and damn they are tight. Wild to think that another wire could fit through there
chipzillaRegular35 posts
Posted Jul 1, 2026, 5:30 PM#48

Looks like there's mainly 8mm and 10mm kits, but I found these two:

5mm strip connecter with female barrel (https://a.co/d/01MPoL1D?tag=amznpcfx-20) or this (https://a.co/d/01bgsddH?tag=amznpcfx-20). Not many reviews on the 5mm strip connectors worries me a bit. Could go with the 8mm, but I just checked the space and it's so tight even without a topper so 5mm seems like it'd work better.

Along with one of these 12V DC splitter 2 male/1 female (https://a.co/d/014WDOp8?tag=amznpcfx-20) could work? Is there a specific DC splitter measurement I need to get? I'm seeing 5.5 x 2.1, 5.5 x 2.5, and 3.5 x 1.35.

Also I found the holes that the stock LED wires go through and damn they are tight. Wild to think that another wire could fit through there

View attachment 1697607 (https://www.pokerchipforum.com/attachments/1697607/)View attachment 1697606 (https://www.pokerchipforum.com/attachments/1697606/)

The new 5mm connector kit you found should work for the strip lights. I can only assume the DC barrel connector size is correct, but the description doesn't say its size. I think the barrel size needed is 5.5 x 2.1mm because that is the size on the dimmer you selected which is the dimmers other have used.

The new splitter you found has the wrong size I think at 5.5 x 2.5mm. I think you need 5.5 x 2.1mm. As I said before, I didn't use these type connectors, so I can't absolutely confirm. But I would just try them and return to Amazon (https://www.amazon.com/?tag=amznpcfx-20) if they don't fit.

Yeah, that hole is small for snaking the new LED strip through it. But it should be doable with some difficulty. Get a firm but flexible wire and snake it through that hole with the new LED strip firmly taped/affixed to the end of the snake wire.

sjpj21wMicro-Stakes Grinder19 posts
Posted Jul 1, 2026, 7:07 PM#50

Final Amazon (https://www.amazon.com/?tag=amznpcfx-20) cart. Just need to find a good Milwaukee drill to getter done. Decided to end up going with the wireless battery. Would I need any extra wiring for the battery or couldn't it fit in one of the splitters?

The new 5mm connector kit you found should work for the strip lights. I can only assume the DC barrel connector size is correct, but the description doesn't say its size. I think the barrel size needed is 5.5 x 2.1mm because that is the size on the dimmer you selected which is the dimmers other have used.

The new splitter you found has the wrong size I think at 5.5 x 2.5mm. I think you need 5.5 x 2.1mm. As I said before, I didn't use these type connectors, so I can't absolutely confirm. But I would just try them and return to Amazon if they don't fit.

Yeah, that hole is small for snaking the new LED strip through it. But it should be doable with some difficulty. Get a firm but flexible wire and snake it through that hole with the new LED strip firmly taped/affixed to the end of the snake wire.

chipzillaRegular35 posts
Posted Jul 2, 2026, 2:49 AM#51

Final Amazon cart. Just need to find a good Milwaukee drill to getter done. Decided to end up going with the wireless battery. Would I need any extra wiring for the battery or couldn't it fit in one of the splitters?

View attachment 1697747 (https://www.pokerchipforum.com/attachments/1697747/)

I couldn't open the splitter you chose since the link you provided above was not the splitter. But if it has the 5.5 x 2.1mm barrel connectors, then it should work.

The connector kit link looks good since its 5.5 x 2.1 and 5mm strip connector.

If your battery case has the 5.5 x 2.1mm male barrel connector , then you don't need additional wires. I see that case plus AA batteries cost $28 together. You may want to consider using instead this rechargable pack for $24. It is 12v and has a 5.5 x 2.1mm barrel connector according to the description.

https://www.amazon.com/gp/aw/d/B01M7Z9Z1N?psc=1&ref=ppx_pop_mob_b_asin_image (https://www.amazon.com/gp/aw/d/B01M7Z9Z1N?psc=1&ref=ppx_pop_mob_b_asin_image&tag=amznpcfx-20)

Others have used it:

https://www.pokerchipforum.com/threads/barrington-poker-table-thread.30910/post-2622944

https://www.pokerchipforum.com/threads/barrington-poker-table-thread.30910/post-2628666

https://www.pokerchipforum.com/threads/barrington-poker-table-thread.30910/post-2383125

As I mentioned previously, I didn't use this 12v pack. I went the 5V route instead and used an existing 5v battery/bank that also charges my cell phone.

For the cupholder mod, in case you haven't seen it, here is THE step by step guide by @RadicusScout (https://www.pokerchipforum.com/members/10148/) for the mod. The Lenox hole saw you selected is still the best, IMO:

https://www.pokerchipforum.com/threads/barrington-poker-table-thread.30910/post-2405037

You're almost there. Good luck!

sjpj21wMicro-Stakes Grinder19 posts
Posted Jul 8, 2026, 5:14 PM#52

I couldn't open the splitter you chose since the link you provided above was not the splitter. But if it has the 5.5 x 2.1mm barrel connectors, then it should work.

The connector kit link looks good since its 5.5 x 2.1 and 5mm strip connector.

If your battery case has the 5.5 x 2.1mm male barrel connector , then you don't need additional wires. I see that case plus AA batteries cost $28 together. You may want to consider using instead this rechargable pack for $24. It is 12v and has a 5.5 x 2.1mm barrel connector according to the description.

https://www.amazon.com/gp/aw/d/B01M7Z9Z1N?psc=1&ref=ppx_pop_mob_b_asin_image (https://www.amazon.com/gp/aw/d/B01M7Z9Z1N?psc=1&ref=ppx_pop_mob_b_asin_image&tag=amznpcfx-20)

Others have used it:

https://www.pokerchipforum.com/threads/barrington-poker-table-thread.30910/post-2622944

https://www.pokerchipforum.com/threads/barrington-poker-table-thread.30910/post-2628666

https://www.pokerchipforum.com/threads/barrington-poker-table-thread.30910/post-2383125

As I mentioned previously, I didn't use this 12v pack. I went the 5V route instead and used an existing 5v battery/bank that also charges my cell phone.

For the cupholder mod, in case you haven't seen it, here is THE step by step guide by @RadicusScout (https://www.pokerchipforum.com/members/10148/) for the mod. The Lenox hole saw you selected is still the best, IMO:

https://www.pokerchipforum.com/threads/barrington-poker-table-thread.30910/post-2405037

You're almost there. Good luck!

We're getting somewhere!! Just need to actually stick the lights in and figure out all the technical wiring/threading of it all. Dimmer, battery pack, lights, and wiring all work great!

sjpj21wMicro-Stakes Grinder19 posts
Posted Jul 8, 2026, 8:49 PM#53

Everything's threaded through, but I'm unsure what to do with the free red/black wire on the end that isn't hooked to the dimmer or battery pack, since it lights up fine when left unattached. Should I attach that to something or just fasten it so it stays loose?

chipzillaRegular35 posts
Posted Jul 8, 2026, 9:10 PM#54

Alright all threaded through, but I'm a little confused on what to do with the loose red/black wire on the end that isn't connected to the dimmer/battery pack because it lights up fine with it loose. Am I supposed to connect that to anything or just secure it loose?

View attachment 1700196 (https://www.pokerchipforum.com/attachments/1700196/)

I'm not sure I understand how you connected your LED strip to the dimmer and battery. It looks like you have used only one-half of your splitter connector and connected only one long single string of LED light going around the full length of the table? The two barrel outputs of the splitter should be connected to one each LED strip and the single barrel of the splitter connected to the dimmer. Each LED strip covers half of the table (cut the strip to fit your table). The end of the strip on the end away from the battery would not need a COB connector or wires attached, and the LED strip there can just be cut to fit your table. Hopefully I am understanding what you did.

Connect as follows: Battery --> dimmer --> splitter (single barrel connector to dual barrel connector) --> LED strip light (one each on the dual barrel connector).

sjpj21wMicro-Stakes Grinder19 posts
Posted Jul 8, 2026, 9:24 PM#55

I'm not sure I understand how you connected your LED strip to the dimmer and battery. It looks like you have used only one-half of your splitter connector and connected only one long single string of LED light going around the full length of the table? The two barrel outputs of the splitter should be connected to one each LED strip and the single barrel of the splitter connected to the dimmer. Each LED strip covers half of the table (cut the strip to fit your table). The end of the strip on the end away from the battery would not need a COB connector or wires attached, and the LED strip there can just be cut to fit your table. Hopefully I am understanding what you did.

Connect as follows: Battery --> dimmer --> splitter (single barrel connector to dual barrel connector) --> LED strip light (one each on the dual barrel connector).

Hmmm but the dimmer has one male which goes into the battery and the other end is female which could get connected to one of the males in the splitter, leaving a male and female left for the LEDs. I could do Battery --> dimmer --> splitter 1 ---> LED Strip 1 AND splitter 2 ---> LED Strip 2?

chipzillaRegular35 posts
Posted Jul 8, 2026, 10:09 PM#56

Hmmm, but the dimmer has a male plug that connects to the battery and a female socket that could mate with one of the male plugs on the splitter, leaving one male and one female for the LED strips. I could do Battery --> dimmer --> splitter 1 ---> LED Strip 1 AND splitter 2 ---> LED Strip 2?

I think you’re using an LED strip connector that has a COB connector on one side and a female barrel connector on the other. If that’s the case, the hookup would be:

LED strip light #1 --> COB-connector-to-female-barrel-connector-#1 --> male-barrel-connector-of-the-splitter-#1 (one of the splitter’s dual male outputs) - to - single-female-barrel-connector --> male-barrel-output-of-dimmer --> dimmer --> female-barrel-input-of-dimmer --> male-barrel-cable-that-connects-to-your-battery --> female-barrel-connector-of-battery.

"#1" above represents an LED strip for half the table. Repeat the same for 2 for the other half of the table, i.e., substitute with "#2".

sjpj21wMicro-Stakes Grinder19 posts
Posted Jul 8, 2026, 10:36 PM#57

I think you're using a connector for your LED strip that has a COB connector on one side and a female barrel connector on the other. If so, the wiring should be arranged like this:

LED strip light #1 --> COB-connector-to-Female-barrel-connector-#1 --> male-barrel-connector-of-the-splitter-#1 (one of the dual male outputs) - to - single_female-barrel-connector --> Male-barrel-output-of-dimmer --> dimmer --> female-barrel-input-of-dimmer --> male-barrel-connector-to-female-barrel-connector (the cable that comes with your battery) --> female-barrel-connector-of-battery.

"#1" above refers to an LED strip for one half of the table. Repeat the same for 2 for the other half of the table, substituting with "#2".

I'm a bit confused. I think hooking up the second, currently unconnected splitter output would make it work, but that may not be the specific recommendation you're making. I now understand that the LEDs need to be cut roughly in half so each half fits 1/2 of the table, and then each cut end of the strips must be attached to its own COB connector.

chipzillaRegular35 posts
Posted Jul 8, 2026, 11:47 PM#58

I do get now that the LEDs need to be cut basically in half for each half to fit 1/2 of the table and then each end of the LEDs need to be connected to it's own COB connector.

Yes, this is correct, you need two pieces of strip light for each 1/2 of table. Cut and connect as you note.

In your picture showing connections, I can't clearly understand how the dimmer is connected to the battery ( I didn't use this specific dimmer). Please confirm you have connected the dimmer's female barrel plug to the battery's plug (which I think is male). The picture of the dimmer from Amazon (https://www.amazon.com/?tag=amznpcfx-20) shows the dimmer's female plug is the correct INPUT which should connect to the battery.

View attachment 1700221 (https://www.pokerchipforum.com/attachments/1700221/)

In your picture above showing connections, you have used your splitter cables unconventionally. The normal use is to connnect the single output of the dimmer to two different strip lights (for each half of your table). But instead, you have used the splitter as a simple connector from the dimmer output to only ONE strip light. But if you do that, you can't connect two strip lights at the same time to one dimmer. Flip that splitter cable around and connect it's single barrel connector to the dimmer OUTPUT, and connect the dual side of the splitter cable to each of the two LED strip lights.

Here is the old picture and post from @greedyintern (https://www.pokerchipforum.com/members/17235/) showing how he connected the same parts you are using and how the splitter cable is properly used:

https://www.pokerchipforum.com/threads/barrington-poker-table-thread.30910/post-2352520

sjpj21wMicro-Stakes Grinder19 posts
Posted Jul 8, 2026, 11:52 PM#59

I think I’ve identified the problem. The dimmer’s male plug is going directly into the battery’s female socket. I don’t have a male-to-female adapter because the battery didn’t include one (it only came with a wall charger and a splitter): https://www.amazon.com/gp/aw/d/B01M7Z9Z1N?psc=1&ref=ppx_pop_mob_b_asin_image (https://www.amazon.com/gp/aw/d/B01M7Z9Z1N?psc=1&ref=ppx_pop_mob_b_asin_image&tag=amznpcfx-20).

But could I just use the splitter that came with the battery between the battery and my splitter to fix it? That would leave a loose female connector between the battery and the dimmer.

chipzillaRegular35 posts
Posted Jul 9, 2026, 12:00 AM#60

I think I see the problem. The male plug on my dimmer is going directly into the female connector on my battery. I'm missing a male‑to‑female adapter because this battery didn't include one (it only came with a wall charger and a splitter): https://www.amazon.com/gp/aw/d/B01M7Z9Z1N?psc=1&ref=ppx_pop_mob_b_asin_image (https://www.amazon.com/gp/aw/d/B01M7Z9Z1N?psc=1&ref=ppx_pop_mob_b_asin_image&tag=amznpcfx-20).

But couldn't I simply use the splitter that came with the battery between the battery and my dimmer and fix it? That would leave an unused female connector between the battery and the dimmer.

Yes, I believe you can use the battery’s supplied splitter for that. You can leave the extra splitter connector unused.

sjpj21wMicro-Stakes Grinder19 posts
Posted Jul 9, 2026, 3:13 AM#61

Yes, I believe you can use the battery’s supplied splitter for that. You can leave the spare splitter plug unused.

Alrighty, I think we’re good then:

Thanks for all the help!!! I’ll post updated photos once the new lights arrive. I made a mess the first time. I accidentally tried to run one continuous LED strip around the entire table and it split as I was flipping the table and it folded over a bit.

Now I’m curious how others handle the gap where two different LED strips meet on the hole side...

chipzillaRegular35 posts
Posted Jul 9, 2026, 5:01 AM#62

Alrighty, I think we're in business then:

View attachment 1700248 (https://www.pokerchipforum.com/attachments/1700248/)

Thanks for all the help!!! Will show updated pics once the new lights come in. Made a mess of it the first go around. Accidentally tried going around the whole table with one continuous LED and it split as I was flipping the table over and it folded in half a bit.

Now I'm wondering how people deal with the gap between the two different LED strips on the hole side...

That should work. If your existing strip got bent when you folded the table, maybe you can just cut off the damaged portion and use the remaining length if the two halves are still long enough. At minimum, you can use it to connect to your two cob strip connectors in your pic to confirm everything lights up.

For routing the new strips, just follow the existing stock strip. it enters the the table from the holes on the bottom. It terminates at the other side of the table where it folds. Just look at the existing lights. Cut your new strip at their designated/allowed cut locations to fit your table.

sjpj21wMicro-Stakes Grinder19 posts
Posted Jul 9, 2026, 8:12 AM#63

That should work. If your existing strip got bent when you folded the table, maybe you can just cut off the damaged portion and use the remaining length if the two halves are still long enough. At minimum, you can use it to connect to your two cob strip connectors in your pic to confirm everything lights up.

For routing the new strips, just follow the existing stock strip. it enters the the table from the holes on the bottom. It terminates at the other side of the table where it folds. Just look at the existing lights. Cut your new strip at their designated/allowed cut locations to fit your table.

Looks like it worked! Unfortunately it broke in a place where at the full length of one of the LED's lights doesn't reach the hole so I think I'm gonna have to redo it :/

sjpj21wMicro-Stakes Grinder19 posts
Posted Jul 11, 2026, 6:37 AM#64

We pulled it off, fam. Big thanks to @chipzilla (https://www.pokerchipforum.com/members/20933/) for all the amazing help and for not quitting on me lmao. Now I only need to get my custom topper and I'll be good to go.

mxr53Newbie1 posts
Posted Sep 24, 2026, 3:56 AM#65

Question: I want to install a COB LED mod in my table that currently has the blue LED strip. Why not simply remove the existing strip and replace it with the COB strip, instead of mounting the new COB strip on top of the old one? It looks odd sitting on top of the original strip.

MrBooshRegular32 posts
Posted Sep 24, 2026, 11:23 AM#66

Question? I’m planning the COB LED mod for my table that currently has blue LEDs. Why wouldn’t I remove the existing strip and install the COB strip in its place, instead of mounting the COB on top of the original? It looks a bit odd sitting over the old strip.

Removing the originals is straightforward. I’ve replaced the LEDs on two tables: on one I installed the COB over the existing strip, and on the other I removed the original before installing. There isn’t a huge difference either way, though I slightly prefer taking out the old strip first.

Real players. Deep discussions. Better poker.poker.forum